오늘은 실무에서 굉장히 많이 사용하는 Try-with-resources 문법에 대해 정리해두려고 한다.
Try-with-resources 는 Java 7 부터 도입된 문법인데 기존의 try-finally 에 비해 장점이 있어 실무에서 많이 사용된다.
먼저 기존에 사용하던 try-finally 방법에 대해 말씀드리겠다. 아래 예시를 보자.
public static void main(String args[]) throws IOException {
    FileInputStream fis = null;
    BufferedInputStream bis = null;
    try {
        fis = new FileInputStream("test.txt");
        bis = new BufferedInputStream(fis);
        int data = -1;
        while((data = bis.read()) != -1){
            System.out.print((char) data);
        }
    } finally {
        if (fis != null) fis.close();
        if (bis != null) bis.close();
    }
}
위의 예시는 간단하게 특정 파일의 데이터를 읽어 출력하는 내용인데, 사용 후 반납해줘야하는 자원들은 Closable 인터페이스를 구현하고 있고 사용 후에 close 메서도를 호출하여 자원을 해제하였다. 하지만 이러한 방식은 실무에서 몇몇의 문제를 야기하였다.
일단 작업해줘야할게 늘어나고 코드가 복잡해지다 보니 많은 I/O가 발생하는 작업에서 실수가 빈번하게 일어나 자원을 반납하지 못하는 경우가 생겨 났었다.
그리고 에러로 인해 자원을 반납하지 못하는 경우에 에러 스택 트레이스가 누락되어 디버깅하기가 어려워 질때가 있었다. 예를 들어 위의 예시에서 try 블록 내부의 read 메서드에서 에러가 발생하고 그리고 finally 블록에서 close메서드에서도 에러가 발생하면 read 메서드에 대한 에러 스택 트레이스는 누락되고 close 에 대한 내용만 남는다. 이러다보니 디버깅에 어려움을 겪는다.
디버깅에 용이한 Try-with-resources
이러한 문제를 해결해 줄 수 있는 방법이 바로 Try-with-resources 이다.
public static void main(String args[]) throws IOException {
    try (FileInputStream fis = new FileInputStream("test.txt");
         BufferedInputStream bis = new BufferedInputStream(fis)) {
        int data;
        while ((data = bis.read()) != -1) {
            System.out.print((char) data);
        }
    }
}
이방법을 이용해 코드를 작성하면 굉장히 코드가 간결해지고 간단해진다.
이러한 구조를 사용할 수 있는 이유는 바로 기존의 Closeable 인터페이스에 AutoClosable 를 확장했기에 가능하다.
public interface Closeable extends AutoCloseable {

    public void close() throws IOException;

}

public interface AutoCloseable {

    void close() throws Exception;

}
아까전에 내가 try-with-resources 방법을 통해 스택트레이스 추적이 용이해진다고 했는데 조금 더 알아보기 위해 아래 예시를 작성하였다.
public class MyResource implements AutoCloseable {

    @Override
    public void close() throws RuntimeException{
        System.out.println("close");
        throw new IllegalStateException();
    }

    public void test() {
        System.out.println("test");
        throw new IllegalStateException();
    }
}
강제로 런타임 에러를 발생시키고 try-finally 와 try-with-resources 방식의 스택트레이스를 비교해보자.
1. try-finally
public static void main(String args[]) throws IOException {
tryFinallyTest();
}
public static void tryFinallyTest() {
MyResource mr = null;
try {
mr = new MyResource();
mr.test();
} finally {
if (mr != null) {
mr.close();
}
}
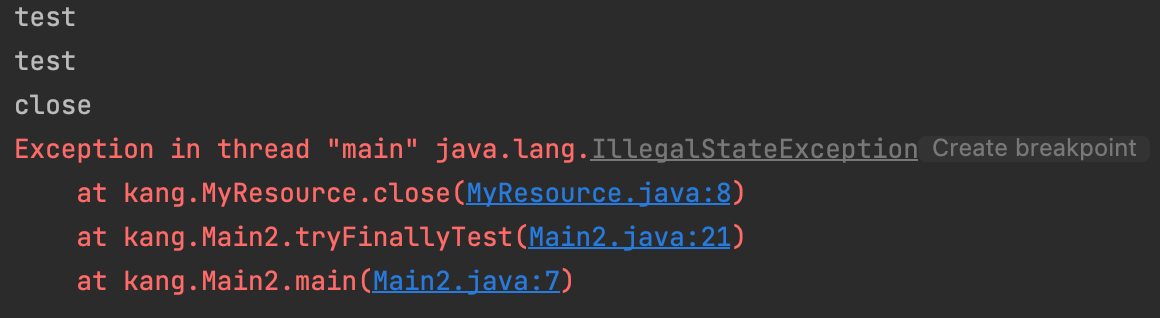
}먼저 try-finally 방식으로 햇을때는 test 메서드 호출에 대한 스택 트레이스가 누락된 것을 확인할 수 있다.

2. try-with-resources
public static void main(String args[]) throws IOException {
    tryWithResourcesTest();
}

public static void tryWithResourcesTest() {
    try (MyResource ms = new MyResource()) {
        ms.test();
    }
}
누락 없이 잘 표시되는 것을 확인할 수 있다.
누락없이 자원 반납이 가능한 Try-with-resources
try-with-resources 방식을 사용하면 자원 반납에 대한 실수를 방지할 수 있다.
예시를 보여드리기 위해 기존에 작성했던 MyResource 클래스에서 test 메서드에서 예외를 던지는 부분을 제거했다.
public class MyResource implements AutoCloseable {

    @Override
    public void close() throws RuntimeException{
        System.out.println("close");
        throw new IllegalStateException();
    }

    public void test() {
        System.out.println("test");
    }
}
이번에는 리소스 두개를 만들고 사용한 뒤 해제하는 로직을 try-finally 와 try-with-resources 각각 작성하여 테스트 해보자.
1. try-finally
public static void main(String args[]) throws IOException {
    tryFinallyTest();
}

public static void tryFinallyTest() {
    MyResource mr1 = null;
    MyResource mr2 = null;

    try {
        mr1 = new MyResource();
        mr2 = new MyResource();
        mr1.test();
        mr2.test();
    } finally {
        if (mr1 != null) {
            mr1.close();
        }

        if (mr2 != null) {
            mr2.close();
        }
    }
}
mr2 가 mr1의 close 메서드가 호출되면서 발생한 예외때문에 정상적으로 닫히지 않은것을 확인할 수 있다. 이러한 현상을 방지하기 위해 mr1 과 mr2 모두 각각 close 메서드가 호출되는 부분을 try-finally로 묶어줘야하는데 초보 개발자 뿐만아니라 중급, 고급 개발자도 이런 부분을 놓치고 실수하는 경우도 본적이 있다. 하지만 try-with-resources 방법을 이용하면 이런 걱정을 할 필요가 없다.
2.try-with-resources
public static void main(String args[]) throws IOException {
    tryWithResourcesTest();
}

public static void tryWithResourcesTest() {
    try (MyResource mr1 = new MyResource();
         MyResource mr2 = new MyResource()) {
        mr1.test();
        mr2.test();
    }
}
결과를 보시면 정상적으로 두가지 자원이 다 반납되는 것을 볼 수 있다.
여러분들도 현재 프로젝트에서 try-finally 로 자원을 반납하게 처리된 로직이 있다면 과감하게 try-with-resources 방식으로 변경하는 작업을 해보자 .
끝
'Programming > JAVA' 카테고리의 다른 글
| [Effective Java] 공통 메서드 정리 - toString (0) | 2023.02.02 |
|---|---|
| [Effective Java] 공통 메서드 정리 - equals() & hashCode() (0) | 2023.02.01 |
| [Effective Java] Primitive Type 과 Wrapper Class (0) | 2023.01.30 |
| [Effective Java] Config 파일에 DI (Dependency Injection) 사용하기 (0) | 2023.01.28 |
| [Effective Java] 인스턴스 생성을 막기 위해 private 생성자를 이용하자 (0) | 2023.01.28 |


댓글